#OTTAWA PROFESSIONAL GRAD/GRADS PHOTOGRAPHER, HEAD SHOT, FAIRY DAY & FAMILY PORTRAIT PHOTOGRAPHER, OLD PHOTO PICTURE RESTORATION REPAIR, GRADUATION STUDIO PHOTOGRAPHER JEFF RYAN PHOTOGRAPHY
FEBRUARY 2024
Hello Ladies & Gentlemen:
What a pleasure to have the opportunity of sharing additional photographic knowledge with you this month and as always, please let me wish you the very best this year in your photographic journey!
Firstly, I have had from time to time, people inquire if writing my blog column requires much of an investment of time itself. My response to this question would be yes. Particularly if you intend in creating something which is beneficial to people. Many blogs on the internet as I am certain you are already aware of, amount to essentially excessive chatter or rather non productive conversations. I would encourage you to give much thought to your writing skills seeing as to the way you are hoping to acquire readers to your site but more importantly, produce something of value to others. I create and design my own blog articles including the overall layout of my website, striving for structure with clearly formulated thoughts answering visitors questions quickly. Take some time and thought when formulating your ideas and produce solid, concrete tips for your friends or guests. People will be far more inclined to visit you more frequently if they are truly getting something out of your writings.
This month, I would like to relate another real life incident which at the time it occurred, was most annoying however, if you have done your homework you should for the most part, be able to resolve this unfortunate situation which I will share with you now quickly. My intent with today’s feature, is to ensure you will be covered with familiar groundwork of exposure information regarding your camera’s light meter operation should breakdown occur.
My services were requested to be the main photographer at an outdoor social event which took place in the summer months. I was commissioned to record numerous groups of people in various locations over a period of approximately four hours. The people at this outdoor event were as one would imagine, scattered at numerous points on this diversified peace of property. These areas included people standing in full sunlight and shadowed areas producing a wide range of exposure settings on my camera. (I would like to mention here should any of you have forgotten from previous articles, that I am for the most part, a manual photographer. This means that I do not set my camera on automatic and depend upon whatever it decides is the correct exposure setting).
Into my second hour of photography, I began to notice the difficulty I was having achieving levels of consistency from my in camera light meter. This is when having a background of so many years working behind a camera calculating exposure settings manually will benefit you. (I realize at this point many of you do not have years of experience becoming familiar with the workings of your camera. It does take a lot of observation to comprehend exposure settings based upon the scene you are trying to record. My advice to those who haven’t taken the time to notice the exposure settings of each scene you are recording, is to briefly itemize the scene and settings on a notepad and once you have compiled a fairly extensive list, have it laminated and carry it with you in your camera bag or otherwise).
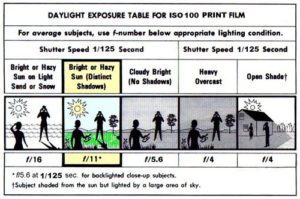
I am a photographer who stays on top of his equipment regarding it’s operation. On this day however, after altering the settings of my camera depending upon the scene, I realized that even with a brand new battery, my light meter was failing. This meant that I could not in anyway, depend upon the exposure readings my camera was providing me with. Here is how I solved the problem: I remembered from years ago, when I would purchase a new roll of film that the box it came in frequently contained a piece of paper providing information about the film but more importantly, exposure information for people who’s camera’s did not contain light meters. (Yes this is an accurate statement Ladies & Gentlemen. Several cameras I have owned and for that matter, “still own” do not come built with a light meter). Without a light meter, this causes people to make reference to the exposure table which outlines various conditions where you will be photographing. This handy reference guide I have included with this article is something I would encourage you to memorize for future use should you not have it with you if your cameras metering system fails. While the chart is not 100% gospel so to speak, it will unquestionably provide you with a reliable method of ensuring your event will still be able to be photographed with predicable results.
Years ago when film manufactures were creating a system of exposure and development, they came to the conclusion that the two main settings on your camera being, A) the shutter speed and B) the lens opening worked in unison with each other producing a “so-called” correct exposure. Several testing procedures were carried out with numerous camera settings and finally a system of exposure was produced. The table I have included here is a very basic, but straightforward indication of predictability.
How you orchestrate a table of this nature is to essentially, set your camera at “one specific shutter speed”, and then change the lens opening -(the aperture) to a different setting depending upon the quantity of light striking your subject. You will recall I mentioned above I was photographing people in full sunlight and very heavily shaded areas as well. This is why my aperture setting changed frequently to ensure a well exposed image of several scenes containing various levels of light. Generally speaking, these exposure tables often have the ISO set at 100, and the shutter speed setting printed at 1/125 second, with the aperture (lens opening) ranging from F4 (wide open) to F16 which is practically fully closed down limiting excessive light entering the exposure chamber. The exposure table above also mentions making corrections for people/objects that are backlit by the sun. This is a very handy guideline for novices getting their feet wet so to speak when learning exposure systems. Most people today are utilizing digital cameras and a quick analysis of your viewing screen will help you in determining exactly what quantity of exposure you feel most comfortable with should you wish to alter the tables settings.
*Please remember that a digital file is very similar to professional slide/transparency film meaning, it has a very limited tolerance to overexposure. This is important because if too much exposure is placed on a digital file or otherwise, it will be practically impossible to attain a good, well balanced exposure/print.
As always……. “With My Good Wishes Extended” 🙂
Jeff Ryan Photography/Ryan Studio Ottawa
5 STAR PHOTOGRAPHER
40 YEARS IN BUSINESS