OTTAWA PROFESSIONAL PHOTOGRAPHY STUDIO, JEFF RYAN PHOTOGRAPHY, PROFESSIONAL PHOTOGRAPHER, TEACHER, ARTICLE, OTTAWA FAIRY PORTRAIT STUDIO, KANATA, STITTSVILLE, BARRHAVEN, MANOTICK, NEPEAN, ORLEANS.
OTTAWA PROFESSIONAL PHOTOGRAPHY STUDIO, JEFF RYAN PHOTOGRAPHY, OTTAWA REAL ESTATE PHOTOGRAPHY PHOTOGRAPHER, OTTAWA ENCHANTED FOREST FAIRIES PHOTOGRAPHER, LOCAL OTTAWA, OTTAWA SMALL BUSINESS, OTTAWA TOURISM, OTTAWA LIFE, OTTAWA START UP/BUSINESS PHOTOGRAPHER
JULY 2022
TUNGSTEN LIGHTING CONTINUED
Hello Ladies & Gentlemen:
As mentioned in my last months blog article, I will continue my discussion using tungsten lighting to illuminate either products or people for that matter. I have included a couple of images here with explanations as to how I achieved these photographs.
In the first instance, the benefits of tungsten lighting speak for themselves. When placing light on an object, you can rest assured that what you see is what you get. As long as the lights have been metered to assure a correct exposure, you are well on your way to producing imagery of predictability. Since tungsten lighting is a continuous source of light, it gives you great control over the exact placement of your lights. Unlike electronic flash that fires so quickly with unpredictability, you can adjust the height and angle of tungsten lights and judge the effects of them while you are taking the time to examine the lighting effects they create.
PHOTOGRAPHING PEOPLE
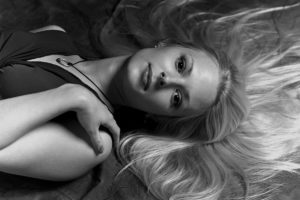
I have often been asked if I use these lights shining directly on a model while photographing them and the answer is two fold. For the most part, I do direct these undiffused lights at the model. The lights I use are 150 watt bulb units and they can be a little bright for some people but most of my previous models have not overly objected to their intensity once I explain the characteristics of them. As in the older days of Hollywood style image creation, lighting apparatus’ such as barn doors which can channel the light into wide beams of light or small slits of it to accent a particular area on the model are used. Barn doors are typically two or four pieces of metal louvres that can be fully adjusted to whatever proportion of light you wish to place on your object. They are placed at the front of the light source. Snoots are another common light control and they are fixed, hollow metal tubes placed over the end of your light creating a narrow, circular beam of light. Snoots come in various dimensions meaning, a wide opening product for light to be directed broadly, or a narrow one spotlighting a specific area.
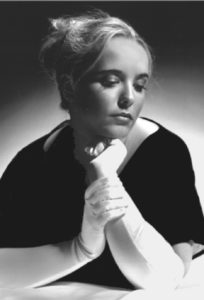
Depending upon your working environment, you would be advised to have a small fan moving air continuously at your model due to the fact that these lights can get fairly warm while in use. My studio set up places lights roughly 5 feet from a model which is a comfortable working distance in regards to a person feeling the effects of the lights heat component. There are several companies that produce higher powered lights which I mentioned previously, and the usage of good air conditioning plus a supplemental fan is a prerequisite. Something else you may consider purchasing are small sized rheostat units that can alter the brightness of your lights. This will permit you to alter the intensity of light on your model decreasing the overall brightness on them plus reducing the heat as well.
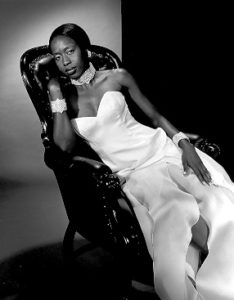
One of the concerns many people have when using tungsten lights is the slow shutter speed required on the camera to record the light correctly. I am often photographing at 1/15 of a second or a little slower. The main concern for many photographers is subject movement creating blurred imagery. If you work slowly with your model and have explained how these lights operate up front, you should not have a problem creating very sharp imagery. Work with your model and speak to them quietly asking them to “hold please”. You will be surprised at the level of successful imagery you will soon acquire.
PHOTOGRAPHING PRODUCTS
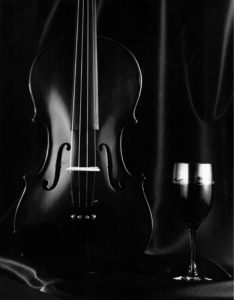
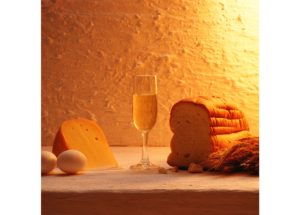
*The above image was created with tungsten lighting placed behind a diffusion screen on camera left, followed by another light accenting the right hand side of the set.
When photographing products, this lighting is excellent. I frequently use lighting panels, soft boxes etc when creating imagery of products with low shutter speeds. Tungsten lighting is often used at slow shutter speeds due to the limitation of a 150 watt bulb. The bulbs simply do not have an enormous amount of brilliance to permit higher shutter speeds. This can be to your great advantage! When I place one of these lights on a stand in behind a large diffusion panel and depending upon the reflections generated from the product, I often see the fabric of the panel in the surface of the product itself. Slow shutter speeds are excellent at this point because they enable you to slightly shake the fabric of your diffusion panel during the exposure. Shaking the fabric with slow shutter speeds means that your camera will not see the detail from the material inherent in the fabric. The result will be an image free of any patterns that might initially be detected.
*The above image was created with “daylight kelvin” settings on my camera along with tungsten lighting.
Another benefit of tungsten lighting is applying it as a background light. I have often used straight, undiffused white light on a background or elected to place a coloured gel over the light to alter the colour of the image. Changing background colour can give your image a real pop further enhancing it’s overall appeal. I have purchased several coloured gels over the years to change background colour but found that you don’t have to acquire a lot of these to create the effects your after. I have created a series of swatch book colours for each of the gels that I own. How I achieved this is as follows: I set up a neutral background white paper and placed two lights, one on each side of the paper at 45 degree angles. I then took a meter reading of both lights and adjusted their intensity so that my light meter reading was mid way on my aperture lens. This f stop was F11. The first exposure I produced was shot at F11, the second exposure I opened up my aperture to F8 and recorded that lens opening. The third exposure I set my lens to was F5.6 and recorded that. I then went back to my initial lens aperture of F11 and shifted it to F16 to begin my second half of exposure density variation and recorded that density, then recorded F22, F32 etc. Once I had these various colour shift densities recorded, it gave me a most predictable method of changing the colour of one single gel to roughly 6-7 colours without absorbing the purchase of several additional gels.

*The above image was created with tungsten lighting placed behind diffusion panels and a coloured gel over the background light. This was a double exposed image. One exposure for the main product, the second exposure for the background.
In closing, I would like to encourage you to try some of my methods of lighting technique mentioned above and not simply alter the colour of backgrounds via Adobe for example. These techniques will make you a better photographer. You will gain an education and enhanced appreciation of lighting control that many do not have. In the Hollywood days of the 1930’s, 1940’s etc, fast operating lighting systems and cameras were simply not available. Remember all those old style glorious black and white photographs of the stars. They were created using the methods featured above. They managed fine without high end photographic equipment creating master pieces of art in fine art portraiture.
Good luck to you should you endeavour to give this months information a try!
With My Good Wishes Extended,
Jeff Ryan Photography/Ryan Studio
www.jeffryan-photography.com