OTTAWA NATURE PHOTOGRAPHER JEFF RYAN/LANDSCAPE PHOTOGRAPHY/ NATURAL ENVIRONMENT/ KANATA/NEPEAN/ STITTSVILLE/BARRHAVEN/ RICHMOND/ ORLEANS/MANOTICK/FACEBOOK/INSTAGRAM/LINKEDIN
OTTAWA PROFESSIONAL PHOTOGRAPHER JEFF RYAN/RYAN PHOTOGRAPHY STUDIO BLOG POST/INSTAGRAM/FACEBOOK/LINKEDIN/ CHILDREN’S FAIRY PICTURE PORTRAITS/MATERNITY/FAMILY/BUSINESS/HEAD SHOTS/COMMERCIAL/GRADUATION/KANATA/STITTSVILLE/BARRHAVEN/RICHMOND/NEPEAN/MANOTICK/ORLEANS
APRIL 2022
Hello Ladies & Gentlemen:
Thank you for being here with me this month! I am always appreciative of your visits to my site and your lovely comments/remarks pertaining to my photography. I am certain all of you are “very much” looking forward to the up-coming summer months just ahead of us due to these on-going concerns of Covid! I hope these next two articles will inspire you to take a little time for yourselves and venture out with your camera in a quiet place representing little activity.
*I have included a few images in this article/blog that you can make reference to pertaining to the featured equipment I have addressed.
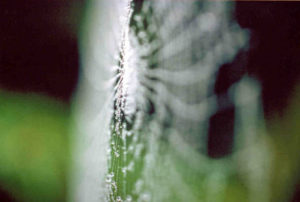
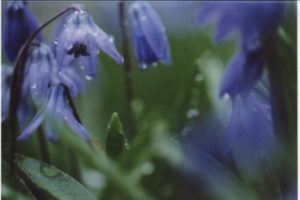
*The Above Image Is Created With A Macro Lens
I was contacted recently by someone requesting information as to how I have created some nature photographs. It’s my pleasure to share with you some helpful photography information in regards to producing imagery which is often considered to be titled Macro or Micro photography. Often times, it is simply referred to as close up photography however I prefer to address this style of image making in it’s correct title because many companies have in fact, produced photographic lenses of remarkably high end quality. These lenses are referred to as macro or micro lenses and I will be speaking about them next month in May 2022 but will make reference to alternate close up gear this month.
BASIC CLOSE UP PHOTOGRAPHY EQUIPMENT
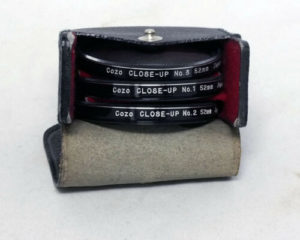
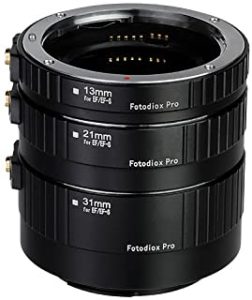
I would like to begin by saying there are additional methods available that you can access which will provide you with the ability to create beautiful micro/macro imagery at a much lesser cost in comparison to purchasing expensive lenses. The products I have used over many years when just starting out were the following: Close up filters and Extension tubes.
This is a particularly wonderful time of the year being Spring to commence this image making venture. Flowers are just beginning to appear and of course, with summer around the corner you have almost limitless possibilities to aim your camera at. Let’s begin by speaking of “Close Up Filters”.
“Very politely” spoken here, for those individuals who might be somewhat limited in funding, the items I am making reference to in this article would be an inexpensive way for you to begin this new discovery. Close up filters are manufactured by several companies and they produce these filters in various strengths.
****Here are 4 links to current listings on both Amazon.ca and Ebay.ca that I reviewed this month for you. These sites are currently featuring the prices of what you would be expected to invest in today-(April 2022)
EBAY.CA—(Close Up Filters)
EBAY.CA—(Extension Tubes)
https://www.ebay.ca/sch/i.html?_from=R40&_trksid=p2334524.m570.l1313&_nkw=+35mm++extension+tubes&_sacat=0&LH_TitleDesc=0&_odkw=close+up+35mm++filters&_osacat=0
AMAZON.CA—(Close Up Filters)
AMAZON.CA—(Extension Tubes)
https://www.amazon.ca/s?k=extension+tubes+35MM&crid=35FY072EW5XDV&sprefix=extension+tubes+35mm%2Caps%2C78&ref=nb_sb_noss

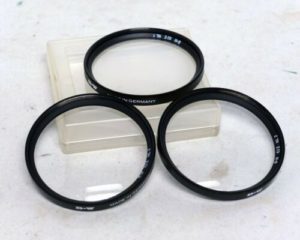
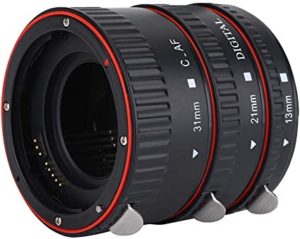
*A Close Up Filter Kit Above Followed By A Set Of Extension Tubes
PRICES
-The pricing of extension tube kits on Amazon.ca containing three tubes range roughly from $40. to $173.
-The prices for close up filter kits on Ebay.ca containing 3 filters are as low as $3.72!
I initially purchased a close up filter kit which contained a set of 3 filters, and was pleased with the results for a few years recognizing both their strengths and weaknesses. Something to take into consideration would be the price of these filters. Obviously, filters commanding a higher price tag indicate the quality of glass is superior to products of a much lesser degree. In saying that, mine were not overly expensive and the lack of sharpness on the perimeter of my imagery did not overly concern me. When camera lenses or certain close up filters are manufactured, companies often indicate that there is “edge to edge sharpness” with very little fall off. Should you be creating close up pictures of flower imagery for instance, the softening of the edges can actually be a welcome addition to your photograph.
Using these filters is also not difficult at all. When you position your camera above an object-(flower for example), one of the best recommendations is to place the strongest close up filter on the end of your camera lens first. If you have a kit of 3 filters, this would mean that close up filter #3 would be the first filter attached to the end of your lens. Now, when viewing your subject, should you find that the filter did not bring you in close enough to your liking, you would then attach an additional filter being a #2 filter. At this point, you now have two filters attached to the end of your lens…..the first being the #3 followed by the #2. The filters should always be attached in this order of succession. Each filters glass is curved at various strengths, and they are designed to operate together to produce the best imagery possible. Continuing with the same example, if you are still not close enough to your subject, affix the additional close up filter as well. You would now have all 3 filters attached to your camera lens.
You will find when combining more and more filters on the end of your camera lens that focusing becomes very important. What happens at this point is that the smallest shift or camera movement closer to your subject either places the object in focus, or out of focus. I always use a tripod for the majority of my photography and you would have to do the same when applying this close up technique ensuring sharp imagery.
The camera lens I started out with was a basic 50mm product that is considered to be a “standard lens” in the extensive array of lenses being manufactured. 50 millimetre lenses have been designed to record imagery as close as possible to the way the human eye views scenes. When starting out in photography, I found this to be a satisfactory product but later realized, it didn’t accurately represent my particular vision. This is why so many lenses of varying focal lengths are produced for either the novice or professional photographer.
***If you feel your current lens doesn’t equate to your needs, consider renting a lens from a camera store that provides this service. Renting a lens for a weekend or a week for that matter, is an excellent decision in comparison to simply committing financially up front making a purchase without actually using the item you are interested in.
METERING WITH CLOSE UP FILTERS
Metering your scene using close up filters is not complicated at all. For years now, the majority of cameras have “through the lens metering” systems in place. This means that attaching one or a series of close up filters to the end of your camera lens will provide you with the regular metering system expectations you are accustomed to recognizing without any calculations required. Whether you are using one close up filter or 3 combined, aiming your camera at the scene and taking a meter reading will provide the camera with all the information it requires to accurately expose your image correctly. Extension tubes depending upon how they are manufactured could be a different story.

The Above Image Is Created With A Macro Lens
METERING WITH EXTENSION TUBES
*Please ensure when purchasing extension tubes that they are compatible with your brand of camera!
One of the main reasons photographers prefer extension tubes over close up filters is due to the fact that they do not contain any optics. They are nothing more than hollow tubes available in different lengths. You will notice on the side of each tube an indicator of the strength of each tube being similar to 12, 20, 36 for example. At the time you decide to make a purchase of these tubes, you have to chose between purchasing “Automatic or Manual” exposure tubes. Automatic tubes are typically the favoured choice for most people because they couple themselves directly to your cameras metering system. This is very convenient and permits full aperture metering with no exposure calculations. The photographer has to do nothing in the way of determining how to achieve a so called “correct exposure”.
Manual tubes are just that. They are completely manual and you must calculate the exposure yourself. Each length of extension tube absorbs X amount of light. This absorption is similar to many camera filters on the market that have a “filter factor”. Filter factors are exposure compensations you must address prior to releasing the shutter of your camera ensuring a successful exposure. How these tubes are used is the following: Similarly to the use of a close up filter, you would attach the strongest-(Longest length tube) to your camera body first. Afterwards, you would affix your chosen lens to the end of this tube. When viewing your subject matter, you would make a decision if one extension tube is sufficient enough to provide you with the image you are trying to photograph. If you find you are not in close enough to your subject, you would remove your lens and affix the next medium sized tube to the already attached longer tube. You now have 2 extension tubes affixed to your camera body. This additional tube also has a light absorption factor which has to be calculated/compensated for. *In many instances when you purchase a set of good quality extension tubes, a chart indicating exactly what level of compensation required is listed for each of the tubes. You would then simply make exposure adjustments to your cameras settings either being the shutter speed, ISO or aperture.
*The Above Image Is Created With A Combination Of Close Up Filters
In my opinion having used both methods over numerous years, automatic extension tubes are my preferred method of image creation. Because they do not contain any glass elements, they do not degrade the quality of your camera lens in any way. Also, I have often found myself photographing in the rain and having to contend with wiping rain drops from the surface of just my camera lens, as opposed to trying to wipe/clean 3 close up filters plus the UV filter I always have on the end of my lens makes the photography all that more enjoyable.
*A UV filter or Skylight filter is a common filter which all lenses should have! These filters are also known/nicknamed by photographers as “insurance filters” meaning, if your camera should ever hit the ground “lens first”, this filter will more than likely protect your expensive lens from being damaged. A broken filter is much easier to replace than an expensive camera optic. In regards to a camera striking the ground lens first, this happened to me during a rainy day along the wet edge of a lake. My camera was tripod mounted. I often walk with my camera attached to my tripod and place the tripod on my shoulders as I’m moving from location to location. On one incident I stepped on a wet rock, slipped and my expensive zoom lens without a filter struck the edge of a rock face first and was cracked. This has never happened to me again fortunately, even though I adopt the same methods of travel through parks and similar areas. Zoom lenses have many individual pieces of glass in them and after it was evaluated at a reputable repair facility, it was suggested that I discard it entirely and purchase a new one. I have included this explanation on your behalf because it was a real life incident, with a most unfavourable outcome. I learned some first hand knowledge that day which I have shared with many with the hopes that a similar situation will never present itself to you. A replacement lens cost me over $2000. Placing a lens cap on the lens while walking is also an excellent method of protection.
I would like to encourage you-(if a novice) to purchase either of the above products and begin a whole new world of photographic exploration at this time of year! You undoubtedly will be surprised at the beauty of your image creation immediately, without relying on Adobe or other image manipulation programs.
*Always try to design excellent compositions in the viewing system of your camera and depend less upon image manipulation in post production!
Next month it will be my pleasure to discuss actual macro/micro and tilt lenses from brand name camera manufactures.
*In closing, I have elected to purchase an expensive macro lens for close up applications years ago but again, live within your means.
With My Good Wishes Extended To You,
Jeff Ryan Photography/Ryan Studio
www.jeffryan-photography.com