OTTAWA PROFESSIONAL PHOTOGRAPHERS BLOG POST/ WINTER PHOTOGRAPHY TIPS/HELPFUL SUGGESTION LIST/PHOTOGRAPHER SERVING KANATA, STITTSVILLE, RICHMOND, BARRHAVEN, MANOTICK, NEPEAN, ORLEANS
OTTAWA PHOTOGRAPHER BLOG POST / WINTER PHOTOGRAPHY CAMERA ADVICE TIPS/ JEFF RYAN PHOTOGRAPHY OTTAWA/ PROFESSIONAL PHOTOGRAPHER/ STUDIO/ON LOCATION/ FILM/ DARKROOM/ DIGITAL/ FAIRY PORTRAIT/ FAIRIES/ENCHANTED FOREST FAIRY GIRL
DECEMBER 2021
*******DON’T FORGET******** OUR BEAUTIFUL “ENCHANTED FOREST FAIRY PORTRAIT” SESSIONS ARE ON SALE AT 50% OFF !!!!!!!!!!


Hello Ladies and Gentleman:
First and foremost kindly let me take this opportunity to extend my “VERY BEST WISHES” to all of you during this Christmas Season! 🙂
We have all been through so much trial and tribulation over the last couple of years and you certainly deserve a much needed break at this point. Hopefully you will be able to spend some relaxing time with your family and friends in a somewhat “limited capacity” based upon Health Canada’s advisory policies. Please don’t take chances pertaining to your health during the holiday season! Simply stated, it is absolutely not worth doing when it comes time to attending parties or any other social activity until this pandemic is under control. Don’t do it!!!!
ARTICLE/BLOG POST
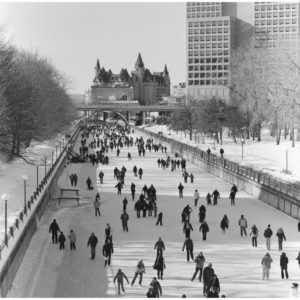
This winter has been relatively mild up to this point however, we all know what’s around the corner. An abundance of cold winds, snow, freezing rain is most likely going to be arriving at our doorsteps sooner rather than later. Photography equipment has to be treated with additional care during winter months due to these adverse conditions. I would like to share some helpful tips with you that I have acquired over several years which will benefit you and protect your equipment.
To all of you who frequently read these blog posts, I would like to thank you very much for your continued interest and I hope my articles are benefiting you in many ways.


WINTER PHOTOGRAPHY TIPS
BATTERIES
When photographing outdoors in winter, the digital camera’s of today being so automated in design depend heavily upon batteries. There are several companies other than your camera manufacturer that produce batteries for your camera. Under normal photographic conditions, I always recommend using brand name batteries such as Nikon, Canon, for example however, well established companies such as Manfrotto produce excellent Lithium-Ion batteries for cold weather photography as well. Don’t purchase discounted, inexpensive after market batteries. It has been my experience that they inevitably will fail at the worst, possible moment. Your camera manufacturers products are unquestionably the best and will deliver better dependability over other inferior products. Contact your local retail camera store and inquire if they carry brand name cold weather batteries such as Canon or Nikon to name a few. On an alternate note, the Manfrotto company is a firm I have been affiliated with for over 40 years and their equipment is excellent. I recommend this firm because they have a proven track record of producing very fine products for the professional photographer. If you do not have specifically “cold weather batteries”, place a couple of extra regular ones in your jacket pocket near your chest area to keep them warm. This will greatly extend their performance as opposed to residing in your camera bag or your pants pocket.
“NIKON BATTERY FEATURED ABOVE”
When your out in the field creating imagery, one of the first indications of batteries beginning to fail are LCD problems which are usually sluggish refresh times, followed by loss of contrast and “grey outs”, which in turn are followed by a complete cold induced blackout. (This non performance if very similar to my iphone when it is subjected to extreme cold). Displays may sometimes show odd colourations along the way, but regardless of how your LCD announces it’s displeasure with the cold, all systems return to normal with no lasting effects once the ambient temperature gets back up to more favourable operating conditions meaning, warmer temperatures. The camera will still work, but you’ll be without the luxury of being able to view your image moments after you press the shutter button. In many instances in my opinion, this can be considered a good thing preventing photographers from constantly relying on an instant review of imagery which was not available prior to the advent of digital photography–Polaroid proofing excepted. As you are most likely aware, the previous film photography cameras did not include an LCD screen for immediate review of imagery. Polaroid proofing on location or in studio was the norm back then but for the most part, many photographers including myself seldom used it unless absolute accuracy pertaining to exposure was required. Pay more attention to what’s in the viewfinder prior to releasing the shutter as opposed to depending upon and LCD image. This will increase your observation techniques along the way and lead to well thought out images.
TRIPODS
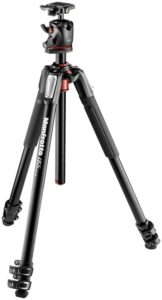
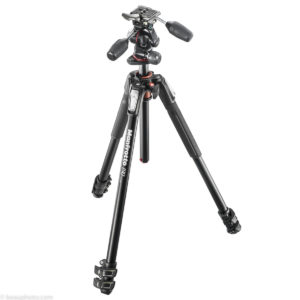
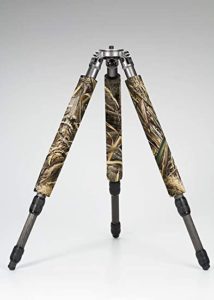
*I have included two images of tripods above: One with a ball & socket head, the other with conventional handles.
Anyone who has followed my educational articles/blog posts or attended my nature photography field trips will already be aware of my preference when it comes to using a tripod for the majority of my work. “So Often” peoples compositions suffer due to poor organization of subject matter in the viewfinder which is then regrettably transferred to memory cards as poor image design. It truly requires so little effort to set up a tripod which guarantees excellent order of your subject matter prior to releasing your shutter. A tripod helps to slow you down “briefly” and observe the person or scene you are photographing. It does not have to take very much time at all from your actual photography and will benefit your visual design skills, as opposed to depending upon software to crop out objects afterwards that shouldn’t have been included in your photograph initially. When outdoors, the majority of my nature photography has been accompanied with the Manfrotto 055 Tri Minor tripod. That was it’s name 35 years ago and it has now been redesigned and upgraded to the following: Manfrotto MD055XPRO3-BHQ2 aluminum 3 section tripod with XPRO ball head and 200PL plate. The current value of this tripod in December 2021 from Amazon.ca retails for roughly $470. Camera stores are comparable to this figure. Many individuals I have conversed with over many years immediately reject tripods because of their cost. This is nothing less than the creation of a false economy. If you are like me and have a tendency to retain equipment for several years, the cost per year of this product becomes inconsequential. Over a ten year period of time, you would have to invest less than $50 a year to ensure excellent image composition! Another good feature of this updated version is that you have the option of purchasing it with or without a “Ball and Socket” head”. The ball and socket head is one I highly recommend over the traditional handle style tripod due to it’s enormous flexibility!

When using my aluminum tripod in extreme winter conditions, I have experienced very cold hands when making adjustments to it’s legs while altering its height. Using mitts as opposed to gloves will always provide you with a greater level of comfort when making these adjustments however there are added methods available to reduce the extremities. A recommendation is to use closed cell leg warmers on aluminum tripod legs to prevent your hands from the extreme cold when making adjustments. These are available in a variety of sizes and colours from companies such as LensCoat, Gitzo, Manfrotto, Miller, and inexpensive clear plastic slip on protectors from Op Tech USA. They will reduce the transition of cold making tripod adjustments more comfortable for you. Alternately, you have the option of purchasing hand warmers placed inside your mitts which are effective solutions. As well as hand warmers, foot warmers are also a good companion to have in your camera bag. Fortunately, we have at our disposal these welcome accessories to increase your enjoyment of picture creation in the winter months. Other tripod designs available are manufactured with Carbon Fibre being lighter in weight and will not be as cold on the hands in winter conditions. Both tripods perform beautifully. ****Don’t forget to examine the second hand market place for used photographic equipment! Based upon my suggestion above related to overall costs of a tripod over a 10 year period of time, your cost per year could be considerably reduced if you are fortunate enough to locate the product in a used camera department.
LENS AND CAMERA PROTECTION IN WINTER
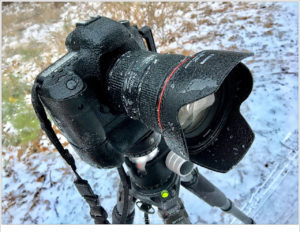
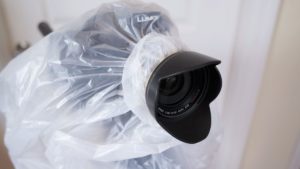
The lenses of today require even more care than lenses of previous generations. The main reason for this is due to the fact that they have an extensive amount of electronics in them which coincide with your camera body. I have often found myself photographing during a snowfall and depending upon the temperature of the day, the snow is either very wet or dry. If wet, you have to take precautionary measures to prevent the wet snow from entering your lens and camera body. A simple solution to this problem is to pack a large zip lock clear plastic bag in your camera case plus a couple of elastic bands. Place your lens in the bag and cut a hole in it. Slide the zip lock bag back towards your camera and affix an elastic band or two on the end of the lens. You should be using a lens hood for this incidentally. Now slide the zip lock bag over the back/top of your camera body and fold it towards the front of your camera allowing you to see through the eyepiece. A rubber eye cup is also recommended. Now, while the snow is falling, it will strike the zip lock bag and not your lens or camera body. This inexpensive bag will save you considerable repair bills should water enter the electronics of your camera body and or lens. *See accompanying photographs.
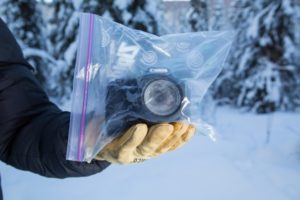
Another tip I have found helpful is upon completion of your photo session, people often go from the extreme cold of outside, to a warm climate inside your home. This immediate fluctuation from cold to warm will cause your camera equipment to form a considerable amount of moisture/condensation on the equipment itself. This can be dealt with by using the same zip lock bag idea. (Do not cut a hole in the bag for this application). Place your camera equipment inside a couple of these bags while you are outside in the cold. Once your gear is zipped up in these bags, “then enter” your home. Now, the condensation will form on the inside of the bag and not on your camera gear. Allow your equipment to remain untouched in your camera bag for a couple of hours while it slowly warms up to room temperature again.
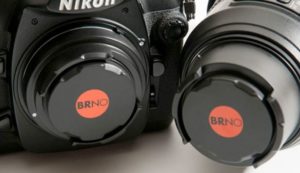
Additional innovative methods of ensuring camera bodies/lenses will be free of humidity if overly present in your area, is the to use a product by BRNO “dehumidifying lens and body caps”. These lens and body caps contain small packets of silica that absorb moisture that may enter your equipment. Once these caps reach their absorption capacity, the packets change colour from orange to green indicating that it is time to insert new packets of silica to maintain effectivity.
Other moisture removing products used by photographers called “Desiccant silica gel packets” are rechargeable by leaving them in a warm oven for a short period of time. These are passive in their procurement of absorbing excess moisture in camera bags.
AIR BULB BLOWER
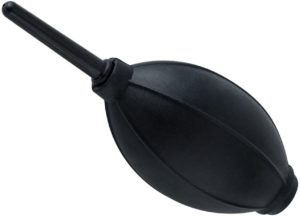
“NEVER” blow on your camera or lens in cold temperatures! The warmth of your breath will cause dry snow to melt and make it’s way inside your equipment. Instead, use a bulb blower. This will blow air the same temperature of the outdoors on your gear and not cause snow to melt. These are inexpensive and well worth it. They are better than cans of compressed air which at times can deposit a residue on your gear particularly when you are cleaning your lenses.
Above are several concerns that many photographers being either a hobbyist, or pro should take into consideration when venturing outdoors during the winter months. There are additional items that I could address regarding winter photography but to keep this blog post within reason, I believe I have made reference to items of priority.
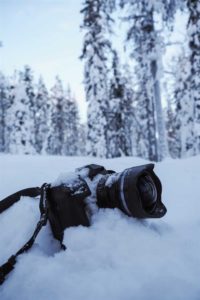
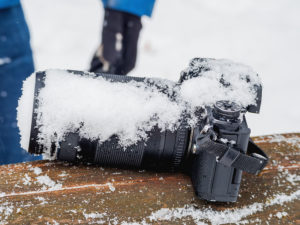
***The image directly above of a camera covered entirely with snow is an absolute possibility, and sadly I have been witness to events of this misfortune! Some of my students over the years regrettably did not have good, solid camera neck straps or failed to consider using their tripods as their main method of support. Within a moments time these unfortunate sets of circumstance can occur if proper care is not addressed initially. After contacting service departments of leading brand name equipment, my students were advised to replace their cameras entirely due to excessive ice and water damage. A costly mistake that you, the reader will never make having read this article! 🙂
“MERRY CHRISTMAS” To All Of You And Thank You For Your Continued Following Of My Articles/Blogs And Courses !
With My Good Wishes Extended,
Jeff Ryan Photography/Ryan Studio Ottawa
www.jeffryan-photography.com