OTTAWA / KANATA / STITTSVILLE / BARRHAVEN / NEPEAN / MANOTICK / RICHMOND / ORLEANS / PROFESSIONAL PHOTOGRAPHER / PHOTOGRAPHY / ATHLETES / DANCE / HEAD SHOT/ ARCHITECTURE
OTTAWA PROFESSIONAL LANDSCAPE ARCHITECTURE PHOTOGRAPHER / OLD PHOTO REPAIR / RESTORATION / FAMILY PARK PORTRAITS / PROFESSIONAL PHOTOGRAPHY / KANATA / STITTSVILLE / BARRHAVEN / RICHMOND / MANOTICK / ORLEANS
SEPTEMBER 2021
Hello Ladies and Gentleman:
I recall attending a luncheon some time ago, and was favourably impressed with the design of the desert my associate had ordered from the menu, and chose to photograph it prior to it’s consumption. To record this image gracefully, was not simply a matter of aiming a camera at the plate and releasing the shutter mechanism. The subtleties of the overcast and at times direct light had to be taken into consideration, plus proper lens selection had to be implemented which would record it appropriately. Adjusting the plate around the table, trying to secure the best lighting angle was essential to produce muted highlights and shadow areas respective of each other. In addition, I did not wish to alter the placement of the fork itself which was placed there previously by the staff as it was situated on a rather dynamic, visual lead in line to the desert.
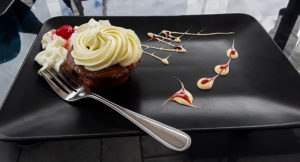
Upon further examination, I felt the need for supplemental lighting of the image, carefully adding information to shadowed areas but not over light them creating competition between highlight and shadow. My adjusted table napkin supported by drinking glasses worked well in creating a “bounce fill” into the shadows providing just enough light to open areas which initially registered as black.
*On a rather humorous note, my affiliation with this “non calorie wise treat?” was beginning to create tension with the individual it was served to, due to the fact that my borrowing this morsel had now extended into 50 minutes. The additional guests at the table were in support of my relinquishing his desert commenting on the fact that it will more than likely be stale before one can enjoy it. Feeling like I was going to become an unwelcome recipient of a “kick under the table” any time soon caused me to eventually surrender my temporary infatuation of this splendid display.
When creating product photography images, a serious photographer must be willing to invest the necessary time to study the design of the item, the colour of light striking the object, the angle of light and established contrast factor, lens selection etc. There is no quick “in and out” of professional product photography whether one is photographing food or any other related object. The enjoyment of this style of image creation is that you can actually make the necessary time to study everything very carefully prior to recording it, as opposed to other styles of photography such as portraits or wedding photography for instance.
The image was recorded with a digital camera with the exposure system set on “manual” to dial in specific exposure adjustments as opposed to the automatic mode which frequently misrepresents a photographer, making it’s own decisions. I was pleased with the final exposure and offered my compliments to the chef based upon his design. In conclusion, I was also able to escape any under table kicks, and my friend consented to forgive me for his somewhat stale snack.
With Good Wishes Extended…………Jeff Ryan Photography/Ryan Studio Ottawa
An Additional Image For Your Consideration Below:
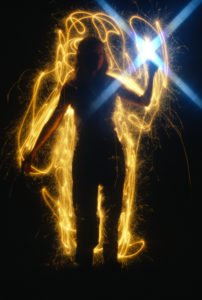
The Canada Day celebrations featuring sparklers and fireworks have long since come and gone, (now being September), however, I wanted to include an image that was recorded with my professional “film camera” during previous celebrations. I mention the words “professional film camera” however it should be clearly understood that in many instances, basic non-professional cameras which permit “manual exposure control” can be utilized, which frequently produce outstanding results. You, the reader should be informed that the marketing techniques implemented in the photographic industry and practically all other areas of retail concern, are designed to convince individuals that they must have this item to succeed with whatever their task. Simply stated….not so! My first camera had only one exposure system in it which was “manual”. Automation was not included with it which in the long run, is unquestionably a benefit to a photographer forcing them to adapt new learning methods of exposure control.
The above image is primarily an adventure in existing light photography and was produced utilizing the following methods. Firstly and without exception, a tripod is a priority and should be used for the majority of image creation. My students have frequently commented on the fact that it takes too long to set one up however this is a falsification of reality. I am able to construct my tripod upon entering a scene taking no more than “thirty seconds”! The benefit of using this item is that you will gain immense control visually as to what is and what is not allowed into your viewfinder. Clean, well ordered image composition is entirely at your hands. This will save you endless hours in the future altering your imagery through digital enhancing computer programs such as Photo Shop for example, which should only be used as a necessity as opposed to creating untidy compositions from the beginning.
Initial check list items of concern before the actual photography begins are selecting a low ISO setting on the camera. Whether this be a film or digital camera, low ISO settings produce favourable imagery. (Using high ISO settings on both camera systems is not recommended and are prone to recording excessive grain/noise in imagery, particularly if underexposure occurs). Next, your camera has to have the option of recording “time exposures”. This allows the shutter to remain open for extended periods of time while the imagery is actually being produced. Cameras frequently have settings titled “Bulb or Timed Exposure” which is required. Following this, a cable release is beneficial permitting the photographer to hold the shutter open for a specific amount of time or alternately, setting the cameras “self timer” for the appropriate amount of time required. Lens settings are commonly stopped down meaning utilizing smaller F-stop openings such as F11, 16, 22 for instance. In addition, to prevent out of focus imagery, I have pre-set the focus on my camera manually at a specific distance and used a string as a measuring tool between my subject and the camera. For this image, I cut a piece of string to an exact length of 10 feet, tied it onto the centre post of my tripod and extended it to my model. It was simply a matter of ensuring the end of the string was at a point where she was standing. The smaller F-stops also typically ensure sharper images however should the model move during the exposure, the image will not be completely sharp in focus. It must be explained to your model ahead of time that they must remain as still as possible during the extended time lapse photography which could last up to approximately 30 seconds on average. Next, I elected to incorporate a portable electronic flash to the image, and had her depress the “open fire” test button on the back of the unit just after the exposure began. The exposure on the flash was set to be one stop brighter than the setting on the camera lens to make it appear brighter in the final image. The camera lens was also affixed with a star filter to further enhance the drama of the image while the flash was fitted with a pale blue filter as well.
Other items to consider are: I wear eyeglasses which must be removed during the exposure since I was standing directly behind her outlining her body with bright sparklers. Eyeglass reflections have been known to appear unwantedly during this type of image creation. Plus, black clothing worn by my model and myself was important to enhance the primary glow of the sparklers themselves. With the camera mounted on my tripod, I composed the image of my model with the “auto focus” setting of the lens set to “manual focus”. Auto focus cameras frequently have a difficult time locking focus on extremely bright or dark objects. Also……look for areas that are “very dark” at night time when doing this type of photography which is a priority. Existing daylight or light emitting from street lights will contaminate this exposure easily causing overexposure to occur. A flashlight is also a welcome tool you should have in your camera bag for night photography.
To begin the photography itself, I tripped the cameras shutter to the “open position” with my cable release, lit the sparklers and began quickly tracing her outline until the sparklers had extinguished. During this time, she fired the flash further accenting the overall image.
This particular type of image creation can be very entertaining and will further one’s education in exposure techniques! The next time you feel in a creative frame of mind, try this technique with a friend and have fun with it!
With My Good Wishes Extended,
Jeff Ryan Photography/Ryan Studio Ottawa
www.jeffryan-photography.com